Here are the other two cards I made for Christmas. I used the new style ink pads with these and boy, are they nice! Much easier to get a good solid image than with the old pads.
Ingredients:
Stampin' Up Word Play and Ornament Keepsakes
Stampin' Up Holiday Ornaments Framelits dies
Embossing folder
Ink: Stampin' Up
Marker: Copic
Red cardstock: Stampin' Up
White cardstock: Neenah
Silver cord: Stampin' Up
Ingredients:
Stampin' Up Merry Messages and Christmas Lodge
Stampin' Up Top Note Die
Ink: Stampin' Up
Kraft cardstock: Stampin' Up
Patterned Paper: Stampin' Up
White cardstock: Neenah
Saturday, December 29, 2012
Friday, December 28, 2012
Christmas cards, part 1
Here are 3 of the cards I made. I used my silhouette for all 3 of these, along with some other tools.
For the one above, I used the following:
The tree from the Lettering Delights Feliz Navidog SVG Set.
Madison Window die from Poppy Stamps
Stampin' Up scalloped border punch
Stampin' Up Merry Messages set
Ink: Stampin' Up
Patterned paper: Stampin' Up
Green and yellow solid cardstock: Stampin' Up
Blue solid cardstock: Bazzill
White cardstock: Neenah
For the one above I used the following:
Presents from the Lettering Delights Tannenbaum SVG set
EK Success scalloped punch
Red cardstock: Stampin' Up
Green cardstock: Bazzill
Patterned Paper: Die Cuts with a View
White cardstock: Neenah
Stampin' Up Seasonal Sayings set
Ink: Stampin' Up
For the one above I used the following:
Shapes from the Silhouette store
Colored cardstock: Stampin' Up
White cardstock: Neenah
Glitter: Art Institute
Embossing folder
The picture below shows the glitter a little better :)
Tomorrow I'll post the other cards I made.
Monday, December 24, 2012
Sunday, December 2, 2012
The hoodie scarf
I wanted some kind of head covering that would keep my noggin warm, but not muck up my hair. I don't really "do" my hair but I do get hat head and I'd like to avoid that. So I saw some hoodie/scarf combos at walmart but didn't really want to buy one when I thought I could make one. It would have been cheaper to buy one. I decided to buy a pattern but it turns out the pattern is like the free tutorials you can find online. So at least I supported a small business, right? The fabric is some minky-ish fleece and some plaid flannel from Joann's. It's been a long time since I've sewn with knits but it all came right back (mostly). The hoodie scarf is reversible and very cozy and warm. Here is my daughter modeling it.
I bought the pattern from jamiechristina.com but if you google "hoodie scarf tutorial" you'll probably find a pretty close match. And free.
Friday, November 2, 2012
Friendship Bag
After making the Halloween pull up treats for my daughter to hand out at dance class, I decided to use some of my leftover fat quarters to make a bag to hold them that she could then give to her teacher. I found this cute friendship bag tutorial but wanted to make the bag bigger. So I used the tutorial and below the pictures I've listed the changes in size that I made. It held 11 pull up treats perfectly.
this one shows the inside and my designer (haha!) label.
I cut the strips-six for each side-2.5" x 6.75", the bottom 6.5" x 12.5", the lining 12.5" x 19" and the handles 2.5" x 17" (instead of following the tutorial I sewed the handles into tubes and turned them right side out). When I boxed the corners, I sewed just under 2" from each point. If I made it again I would do something to stabilize the handles better. They were pretty floppy. But she loved it anyway!
Friday, October 19, 2012
Spring Fling Quilt
I know-it's fall. But we all need some ultrabright neon spring color, right? I pieced this top a few years ago. I can't even remember when-it's been that long-and finally got it sandwiched and quilted in the past few weeks. I bought various amounts of yardage of this fabric, which is Spring Fling by Me and My Sister Designs for Moda, and somehow came up with a pattern that used almost every inch of it. I'm sure that'll never happen again! I did have to buy a little for the back but that does always happen and I always buy clearance stuff for that so it's all good. I used Electric Quilt 5 to figure out the best block size and quilt size to utilize all of my fabric in the best way, using two simple blocks-the 9 patch and the snowball block. Since then I've upgraded to Electric Quilt 7 and love it even more. I used two different fabrics in the binding and of course, rounded corners.
This is a closeup of the two blocks I used. I cut this out almost entirely using my Accuquilt Go (which has since been replaced with a Big Shot Pro) and the 2.5" strip die, 4.5" strip die, and 6" square die.
And the pieced back. Have I mentioned how much I hate making pieced backs? But I love the look and I can't really make myself buy a ton of fabric just so I can avoid a pieced back.
Wednesday, October 17, 2012
Halloween pull up treats
I saw this on pinterest and thought it was a cute idea to use for my daughter's dance classmates. The original source is right here at Splitcoast Stampers. This picture shows how it looks with the candy bar inside:
And this one shows how it looks with the candy pulled out (the lighting caused some funky coloring at the top-it's actually orange up there).
Here are the details:
Cardstock: Stampin' Up Taken with Teal, Pumpkin Pie and Black
Witch image: Lettering Delights Best Witches Cupcake Toppers
Bat shape: Lettering Delights Best Witches Cut Set
Scallop Shape: Silhouette
Glitter (for bat): doodlebug
White Gel Pen (for bat's eyes): Sakura
Stamp: Stampin' Up The More the Merrier
Ink: Stampin' Up Not Quite Navy
Fence Punch: Martha Stewart
Ribbon: American Crafts
Adhesive: Miracle Tape and Tombo Mono Multi
Candy Bar: Hershey
Sunday, September 30, 2012
Vintage Pyrex
A while back I decided that I wanted to get some vintage kitchen things to put on a shelf that I have above my breakfast nook window. I wasn't quite sure what though. I have and love my old canning jars (especially the blue ones and the ones with the wire bail) so I wanted something that would look good with those. Today I think I found it. We were out shopping and saw a little antique mall so we stopped in. One booth had some vintage Pyrex in excellent condition. I knew it was collectible because I'd seen some on some of the quilt blogs I visit. I thought it would look really pretty on the shelf (although I'm beginning to think I need to display these at eye level instead). Here's my big find-I think they are pretty common pieces but I love 'em anyway.
This covered dish is 1 qt
This bowl is 1.5 qts
This bowl (probably my favorite of the 3) is 1.5 pts
If anyone has any information on these, please feel free to share.
This covered dish is 1 qt
This bowl is 1.5 qts
This bowl (probably my favorite of the 3) is 1.5 pts
If anyone has any information on these, please feel free to share.
Wednesday, September 26, 2012
Patchwork baskets
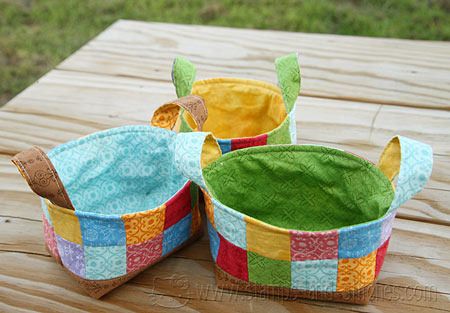
I saw this tutorial on the Pink Penguin blog a year or two ago and have been wanting to make them ever since. I finally got them done! I had some fat quarters from Joann's that I bought only for the tin they came in and they were perfect for this project. I made 3 of them:
Then I decided I wanted a smaller version for my q-tips. I thought 3 patches across would work. Wrong. I forgot about the fact that the sides also form the ends. But it came out cute and it fits my eyedrops. I tried again with 4 patches across, and...success! I did leave the handles off the small ones but otherwise they are basically the same. Cute.
Friday, September 21, 2012
Ornaments card
I have officially started on Christmas cards! Only I just made one and have a lot to go. Hopefully I can keep up this momentum. ha.
The ornaments are from the Lettering Delights Christmas Dee-Licious svg set and I cut them out with my Silhouette SD using Silhouette Studio. All of the paper is from Stampin' Up except for the white, which is from Paper Trey Ink. I think the twine is from Divine Twine. I also used my little sewing machine to sew around the red patterned paper. The white squares are embossed with the Sizzix stars and swirls embossing folder and punched with a 1.5" square from Creative Memories. One ornament is hanging crooked but I'm leaving it. I used a sketch from Retro Sketches.
In case anyone is wondering, these are the settings I use for cutting out Stampin' Up cardstock: blade 5 (4 might be enough), speed 5, pressure 33, double cut (it will cut through with a single cut but some sharp corners do better with a double cut).
Sunday, September 9, 2012
quilts for kids
These are two quilts I made for the Quilts for Kids organization. One was from a kit they sent me and one was from my own stash. The pattern on the one from my stash is called Yellow Brick Road.
Thursday, September 6, 2012
Objects of Desire quilt finished
Tuesday, September 4, 2012
Make a Cake
I've been wanting to try paper piecing and now I can say I did. I really liked making it! I won this set from a contest at Patty's Stampin' Spot and it is perfect for paper piecing. I used an older Mojo Monday sketch.
stamps: stampin' up make a cake
markers (for the pinwheel): copic
paper: echo park
blue card stock: stampin' up
ink: memento
dies: stampin' up and nestabilities
stamps: stampin' up make a cake
markers (for the pinwheel): copic
paper: echo park
blue card stock: stampin' up
ink: memento
dies: stampin' up and nestabilities
Labels:
big shot,
cards,
copics,
nestabilities
Monday, August 27, 2012
Objects of Desire...pinned and ready
This is the second top I've pieced (not counting a small wall size quilt) and it's been sitting for a long time, just waiting to be finished. I've vowed to finish the tops I've done before starting another one (unless I get sick of sandwiching and quilting, in which case I'll cheat). So it's all pin basted and the next step is to quilt it. It's made from an Objects of Desire jelly roll from Moda and boy howdy, is it ever bright. The pattern is from an older issue of American Patchwork and Quilting.
Saturday, August 25, 2012
Pepper Jelly
Last night I made some pepper jelly and it came out so pretty I had to take a picture. Go to my recipe blog here for the recipe.
Monday, August 20, 2012
Nestability organization
We just got back from vacation-that's one reason I haven't posted in a while. It was pretty hectic in the week or two before, getting everything ready, and then we drove from Indiana to Nevada and then to California. I know. Crazy, right? On the trip my son took over the camera and here is a picture he took, I believe, in Colorado.
And here is one of the places we visited in Las Vegas. I'm sure History Channel fans will recognize this.
We didn't see any famous people but we saw a lot of interesting ones!
So the nestabilities. I tried several different methods to organize them. I tried the magnetic folders and the cd cases but nothing worked for me. Then someone at Split Coast Stampers posted this method and I tried it. I love it. It works out perfectly for me. I used some mat board to create some dividers in the box, including one long one on the side for the bigger dies. I used mat boards to put the dies on, and used the magnetic business card things that Staples sells. I cut one in half for each board. On sets that have a really small piece in the center, I put an extra square of magnet there so the small pieces stayed put. Then I made some tabs by printing out the names on card stock and folding and gluing them over the boards that hold my dies. Here's how it looks. I took these with my phone so the quality isn't great but you get the idea.
the box (the top hinges on the back and swings straight up):
the view from the front:
the view from the top:
this shows one board with dies on it:
Monday, July 9, 2012
Another bandanna wallet
After making the last bandanna wallet for my younger daughter, my oldest decided she needed a new wallet too. She wanted a smaller one, also from a bandanna, so she picked out this creepy skull bandanna and here is the wallet. I used the "Koin Keeper" pattern from This & That Patterns.
Thursday, June 14, 2012
Here's to you, Dad!
At first I wasn't sure if a pin-up girl card was appropriate for Father's Day. But then I figured with this sentiment, it works. Plus my dad has an amazing sense of humor and he loves to look at pin-up girls so why not? I used an older sketch from The Sweetest Thing sketch challenge blog.
image from Victoria Case
markers: copic (colors C1 B000 B91 B93 B95 B97 E00 E11 E13 E53 E55 E57 Y15 Y17 R02 )
card stock: stampin' up
patterned paper: echo park
background stamp: stampin' up
ink: stampin' up
word window punch: stampin' up
stickles (for the foam and her necklace)
image from Victoria Case
markers: copic (colors C1 B000 B91 B93 B95 B97 E00 E11 E13 E53 E55 E57 Y15 Y17 R02 )
card stock: stampin' up
patterned paper: echo park
background stamp: stampin' up
ink: stampin' up
word window punch: stampin' up
stickles (for the foam and her necklace)
Labels:
cards,
copics,
digital elements,
stickles
Wednesday, June 6, 2012
Serendipity quilt finish
I started this quilt when I started another one that I was making for a friend, thinking it would save time to do two at a time. Then after it started to take too long for my friend's quilt, I decided I'd better just concentrate on it, so this one went on the back burner. When I finally finished the other one, this one finally got done. It's a fabric collection called Serendipity from Piece 'O Cake designs and the pattern is Sweet Pea by Heather Mulder Peterson (with one less row and a pieced border). I'm not sure how much I like how it turned out-it's extremely busy and bright-maybe a little too much. But it's done and it'll keep someone warm this winter just the same as any other, right? Plus it's a great size for a picnic blanket.
the pieced back
the label (this will probably be my generic label unless I'm making a quilt for someone specific)
I really wanted to get a picture of it with this little stinker on it, but he was more interested in playing.
Friday, May 25, 2012
Snappy Birthday
I made this for the deconstructed sketch challenge #53. I just got this paper pack in the mail and it wasn't quite what I was expecting but it's still pretty cute and goes well with the crab & company set.
stamps: stampin' up crab & company
markers: copic
ink: memento, stampin' up (for sponging)
card stock: stampin' up
patterned paper: echo park paradise beach
border punch: ek success
circle and scallop circle dies: nestabilities
ps-thanks for telling me about feline playful's blog!
stamps: stampin' up crab & company
markers: copic
ink: memento, stampin' up (for sponging)
card stock: stampin' up
patterned paper: echo park paradise beach
border punch: ek success
circle and scallop circle dies: nestabilities
ps-thanks for telling me about feline playful's blog!
Labels:
big shot,
cards,
copics,
nestabilities,
punches
Thursday, May 24, 2012
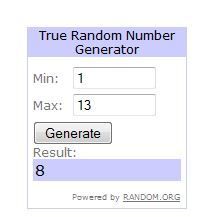
My Memories giveaway winner!!
And the winner is...
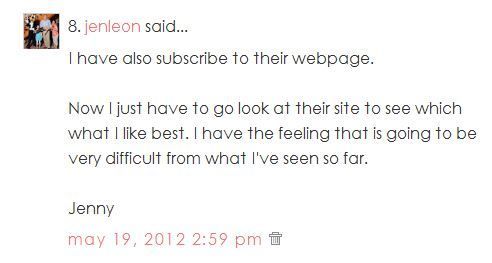
Jenny!
Wednesday, May 16, 2012
My Memories Suite Giveaway!
This giveaway has ended
This is a sponsored giveaway by My Memories Digital Scrapbooking Software.
I've recently had the opportunity to try out this amazing program and I love it so far! Even though I am primarily a paper scrapper, I've been moving to some digital because of the ease of storage. Now that I've tried this, I can add ease of creating a page. It was so nice to "audition" different embellishments and papers and to be able to resize my pictures as I went. With both of these pages I did a lot of resizing after I had almost finished the page, so if I had been doing them with paper, I would have had to just settle for the sizes I had or reprint. This was a lot better. Even if I wanted to do a paper page, the My Memories Suite would be great to preplan my layout before committing it to paper and scissors and glue.
Here are the two pages I've made so far. The first uses all items that are included in the software. The second uses some digital papers and elements I already owned (all by Crystal Wilkerson). I love that I have so many options.
Now you can win your own copy of this great digital scrapbooking software! To enter, just do one or more of the following:
entry 1: go to the My Memories website and under "themes", take a look at what they have to offer, and leave a comment telling me your favorite item.
entry 2: join the My Memories mailing list by signing up at their website or their blog. Leave a comment telling me you signed up.
entry 3: go to the My Memories facebook page and click on "like". Leave another comment telling me you liked them.
entry 4: follow My Memories on Twitter. Then leave another comment telling me you are following them on twitter.
and that's it! I will use random.org to choose a name in a week. Please be sure to provide a way for me to get in touch with you if your email isn't in your profile.
If you just can't wait and you'd like to buy the software, just go to My Memories and use code STMMMS43379 to get $10 off the price of the My Memories Suite V3 PLUS $10 off in the My Memories store!.
This is a sponsored giveaway by My Memories Digital Scrapbooking Software.
I've recently had the opportunity to try out this amazing program and I love it so far! Even though I am primarily a paper scrapper, I've been moving to some digital because of the ease of storage. Now that I've tried this, I can add ease of creating a page. It was so nice to "audition" different embellishments and papers and to be able to resize my pictures as I went. With both of these pages I did a lot of resizing after I had almost finished the page, so if I had been doing them with paper, I would have had to just settle for the sizes I had or reprint. This was a lot better. Even if I wanted to do a paper page, the My Memories Suite would be great to preplan my layout before committing it to paper and scissors and glue.
Here are the two pages I've made so far. The first uses all items that are included in the software. The second uses some digital papers and elements I already owned (all by Crystal Wilkerson). I love that I have so many options.
Now you can win your own copy of this great digital scrapbooking software! To enter, just do one or more of the following:
entry 1: go to the My Memories website and under "themes", take a look at what they have to offer, and leave a comment telling me your favorite item.
entry 2: join the My Memories mailing list by signing up at their website or their blog. Leave a comment telling me you signed up.
entry 3: go to the My Memories facebook page and click on "like". Leave another comment telling me you liked them.
entry 4: follow My Memories on Twitter. Then leave another comment telling me you are following them on twitter.
and that's it! I will use random.org to choose a name in a week. Please be sure to provide a way for me to get in touch with you if your email isn't in your profile.
If you just can't wait and you'd like to buy the software, just go to My Memories and use code STMMMS43379 to get $10 off the price of the My Memories Suite V3 PLUS $10 off in the My Memories store!.
Subscribe to:
Posts (Atom)